Tuesday, April 29, 2008

Second Story Construction

Last time I checked on the girls, they had built comb on the majority of their frames in the first deep hive body. This means that soon they will feel crowded unless given room to expand. If they get too crowded, they will swarm, which would mean "run away from home and make honey in someone's attic rather than in my hives."

So...this weekend I went to the bee supply store in Saluda and bought frames and foundation for a second deep on each hive. I already had the deep boxes, bought in Florida, put together by a friend and painted a lovely light teal.


The frames came already assembled, which saves me a few steps. But the foundation came separately. The foundation is a sheet of beeswax with little bee comb shapes for the bees to build their comb upon.


I figured that it would be self explanatory, putting the foundation in the frames. But, nope, I had to consult my bee books and the internet. First you have to crack a piece of wood out of the top of the frame, using your handy hive tool. As I worked through this, I discovered that the short end of the hive tool was best for popping out the wood, and then the exposed metal end was best for chipping away any extra slivers of wood left behind.


You then put the end of the foundation with no wires sticking out in between the crack at the bottom of the frame, and put the little 90 degree sticking outish wires in the spot where you just chipped out the piece of wood.

Pop that wedge of wood over the wires and whack it a few times with a nail (staple) gun holding 5/8 inch brads, and TA DA! Finished product. I put five brad nails in each wedge, just to be sure.

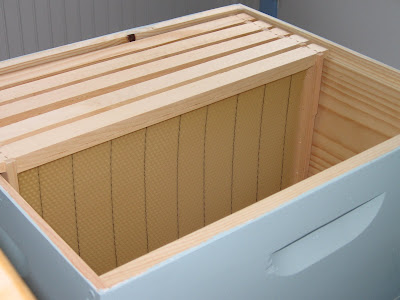
Hung the frames in the box, and they are ready to put on top of the hives. While my initial hive bodies have nine carefully spaced frames, I will start with ten frames on this level while they build their comb.

Right now I'm just waiting for the weather to warm up. We're having frost tonight, so the bees are huddled in their hives trying to keep warm. The second deep will go on each hive in a day or two when it feels like spring again.
Today when I mowed I took the bubble balance out to the hives. They are about an inch off bubble, listing to the left. Aren't we all.

Sunday, April 20, 2008

Feeding the Girls

Today was cool, so I wasn't sure we would get to visit the bees, but it warmed into a pleasant afternoon. Time to replace the baggies of sugar water. If you click on this picture of the left hive (still no names beyond left and right) you can see the empty baggie we took out. There are now stripes on the baggies where the bees busily glued them to the top of the frames. You can also see burr comb on top of the frames, where the bees tried to fill some of the empty space next to the feeder bags with neat apartment space to lay eggs and store pollen and honey. I didn't scrape the burr comb off the top of the frames (something for next time), but I did scrape some off of the inner cover with my hive tool.

In the second picture, of the right hive, you can see the inner cover on the grass behind the hive, with it's brown spots where I scraped off the beginnings of burr comb. If you blow the picture up, you can also see my girls with their little stripes. You can tell which frames they are living on, and which ones till need occupation. I'm getting ready soon to add another box of empty frames so they don't feel too crowded as they finish filling all these frames.

Having received some tips from Pamela at work, and some equipment from mail order, I tried a new arrangement. Instead of putting the baggies right on top of the frames, I put them on top of my queen excluders. Queen excluders are metal grates that allows worker bees to pass but keeps the queen down below...handy when you want frames of honey with no baby bees in them. Also handy for sitting the baggies on top. I made twice as much sugar water this time. And last but not least, I traded the shallow supers that I had around the baggies for an even shallower feeder box. I painted it a light bluish green, giving the hives racing stripes. You can see the edge of the queen excluder between the hive body and the feeder box.


So...today in a nutshell...1) made sugar water; 2) filled baggies; 3) lit smoker and put on veil and jacket; 4) opened hive (one at a time); 5) took out old baggie (they came out pretty easy, just mild sticky as we pulled them off; 6) put on queen excluder with new baggies on top; 7) poked holes in top of feed bags to allow access to the sweet water; 8) scraped brown sticky off the inner covers; 9) added the blue-green feeder box and put the lid back on.

Oh...and took pictures, right before step #6.

Things we learned:

Don't turn the smoker upside down.
Always be ready to light the smoker again.

There are nine frames in my hives. (Most hives have ten frames. Mine have nine with metal spacers to keep them the right distance apart. They will build deeper combs on these fewer frames.)

I probably learned more than that, but that's what comes to mind.


Wednesday, April 16, 2008

Time to Mow


Aiiee, look at all the grass. After a couple cold, damp days in which the bees stayed huddled at home, we had a gorgeous afternoon. Sunshine, dancing bees and tall green grass. So I mowed. I mowed with an eye on the hives at all times. The bees, for their part, ignored me completely. I mowed to the rear of them, I mowed to the sides, I mowed all around the yard. Finally nothing was left but a small square area directly in front of the hives. I stopped mowing and just watched the girls fly home. Six or ten of them at a time would land on the front step and stroll into the hive. They did not dally, but marched on in. It was very peaceful, watching them return. Then, when the traffic had slowed a bit, I took my quiet person-powered old-fashioned mower (what we call the click-click) and carefully finished the job. I did put on a hat for the last few licks, lest some homeward bound chicklet get tangled in my hair and sting in a hair-tangled panic. Other than that, just wore my mowin' clothes. So, not so bad, the mowing. More exciting than usual. These bees, they are adding all kinds of spice to my dull little life.

Tuesday, April 15, 2008

Worry

Saturday I rejoiced in my bees, watched them swirl about in the warm air....and began to worry. Are there too many bees swirling about? Are they swirling like they are supposed to, or are they in some sort of trouble?

Did I feed them enough? Will the cold weather prevent me from checking on them?

Is that left hive listing to one side too much? Why didn't I get the bubble balance out there before the bees came and get the ground level under the hives?

Will they build too much burr comb around the baggie feeder?

Will I do the right things? Will I get stung? Will they up and die?

And so it went Sunday and Monday. I then talked to a coworker who has kept a hive of bees for the last year, and she calmed me down. She reassured me that her bees poke along through life with little effort on her part. I settled down a bit.

Later I read Laura's comment on one of my earlier posts and discovered that new beekeepers all over Asheville are stressing about their little beasties, and it helped to know I'm not the only one with worries.

Today I'm feeling much calmer. The sun came out this afternoon and some of my bees were flying about. Some were visiting the fine little green flowers on the shrubs by the back door. They didn't seem worried at all.

So...taking a deep breath and remembering just to enjoy the sunshine and flowers.

Saturday, April 12, 2008

Naming the Hives

"Left Hive" and "Right Hive" are awfully dull, so the plan is to give each hive its own special name. Top contenders are Lucy and Ethel, Lavern and Shirley, Thelma and Louise, and Leah and Rachel. The name Beulah has floated around, but without a second corresponding name. Please feel free to vote. For a thousand dollars, I will name a hive after you.

Bringing Home the Bees!!!

We rode to the 4H Camp in Swannanoa in the king cab of friend Brian's pickup truck, four of us up early on a Saturday morning. It is good to have friends to help with the bee fetching. Tommy had brought a truck load of bees, most in cardboard boxes (nucs) for beekeepers both new and experienced. A crowd of eager recipients gathered in the morning drizzle, waiting for Tommy to call out their name from his yellow legal pad.

My bees were not in a cardboard box, but screened into their hive body. You can see them on the screen looking for a way out. I am pleased to say that I did not drop them.


We put them in the back of Brian's truck and strapped them down and drove them back home. After putting them in place in the back yard, we went out for a celebratory brunch. Thank you Leah, Brian and Catherine!!


Then I used my hive tool and my smoker for the first time (hive tool in hand, smoker to right in picture) and gently pried the screen off the front of each box.


I added a ziplock bag of sugar water to the top of each hive with a shallow super (the skinny top box) around the bag to prevent the squishing, put a piece of wood in the front of the entrance to give them less territory to guard while they get established, and welcomed them home.

Friday, April 11, 2008

The Buzz Around the Back Door

Outside my back door are two prickly shrubs that scratch me to pieces every year when I try to trim them. For a week or two every spring, however, they are the delight of the local bee and wasp population. Tiny green flowers blossom, sweet in smell and irresistable to the bees.

For the first several years I lived here I dreaded the bloom because it was unnerving to run the gauntlet between the humming plants when they were covered with things I only thought of as "stinging bugs." Emphasis on the "stinging."

Tonight, instead of running past, I stood with my camera, nose practically touching the bees as I tried to take their pictures. Turns out, bees don't mind photography. They are quite tame when you leave them to their business. They could care less about me, since the heady smell of the flower has all their attention.

I also learned that it is very hard to take pictures of bees. They don't hang around. By the time the camera focuses, they are on to the next sweet smelling flower.

See bumblebee and neighbor bee entries below for results of tonight's shoot.

Neighbor bees

Somewhere within four miles of me, someone has some hives of honey bees. I know this, because there are honey bees on my blooming shrub, and my bees are loaded up in their hives, somewhere between here and Statesville, getting ready for their journey to my backyard.

These girls are neighbors, visiting for a favorite springtime snack. I was delighted to see dozens of these neighbors poking about the little green flowers, making themselves very much at home. Perhaps my girls will visit flowers in their back yard sometime soon.


Bumblebees and Carpenter Bees


These fat beasties are carpenter bees. While they are kin to honey bees, they are not what will live in the hives in my back yard. When I first posted these pictures, I labeled them bumblebees, but bumbles are hairier, with much the same round shape. Like dancing hippos, they float through the air, large and round. They nuzzle the flowers, peaceful creatures, huge unlikely marvels of flight.


Tuesday, April 1, 2008

Preparations

After bee school and ordering the bees, my focus has shifted to collecting needed equipment.

I've gathered:

six concrete blocks for the two hives to sit on
two big rocks to put on top of the hives
a smoker
hive tools
two queen separators
extra hive bodies (assembly required)
shallow hive extenders for feeding the bees
a device to provide water
bee pants
bee jackets and veils
bee gloves
a bee brush
a frame grip
a frame holder

Hmm. Off the top of my head, that's the whole list. I'll provide pictures and explanations later, as well as links to my favorite equipment suppliers.

Gathering has been fun. Lots of catalogs, online stores, a field trip to the Dadant store in Florida while heading to the beach, a run to Lowe's for the concrete blocks and a foraging trip behind the garden fence for the big rocks.

I'm sitting in my bee pants right now, since they came today and I needed to try them on.

They are big and baggy, which decreases opportunity for stings. They are white, since one of the secrets to beekeeping is to not look like a black bear. No dark clothes. They also have elastic around the ankles, which is helpful for preventing the little ladies from climbing up my legs and causing hopping and cursing.

I'm a tad concerned about the drawstring top and the fact that I could fit two of me in the waist. It would be less than optimal for my pants to fall down while working the bees.

But having worn them around the house, the drawstring seems to hold firm. So far, so good.

The bees come later this month.